Getting Started
Welcome to Promotion Bar Magento 2 Extension! We would like to thank you for purchasing Promotion Bar Magento 2 Extension! We are very pleased you have chosen Promotion Bar Magento 2 Extension for your website, you will be never disappointed! Before you get started, please be sure to always check out this documentation.
Compatible with Magento:
Magento 2.1.x
Magento 2 Help:
Introduction
This Promotion Bar extension helps to add a promotion bar to your online store in seconds, and engage with your customers easily. Communicate important messages or promotions, encourage social sharing, all in a friendly elegant fashion.
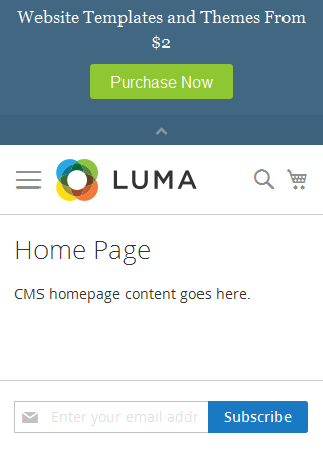
The Promotion Bar is mobile optimized and appears in every page of your website/store, in order to attract the customer's attentions in a non-invasive efficient way. The Bar makes it easy to share a custom message with your audience.
Features
Key Features
- Responsive - Promotion Bar is mobile optimized and appears in every page of your website.
- Custom Message - Add your custom message to the top bar
- Promotion - Promote offers, news and coupons effectively
- Drive Traffic - Easily drive traffic to specific pages
- Easy Style Customize - Promotion bar is the only promotion bar app that allows merchants to edit within theme settings. Customize text and background colors.
- Animation - Add eye catching animation
- Highlight Product - Add a link button to drive more traffic to a specific product - either your own pages or an outside website
- Install With One Click - Installing Promotion bar is easy. Avoid the hassle of coding and install the extension with just a click
- Auto-schedule - Auto-schedule and display bars based on promotion period
- Support Multiple Store - Works perfectly with multiple stores
- Unlimited - Support unlimited active bars
Every Detail is Customizable
- Background Color
- Text Color
- Button Background Color
- Button Text Color
- Bar Style
- Button Style
- Left, Right and Center Alignment Options
- Transition Style
- Stop on Hover
- Mouse Drag
Magento 2 Installation
To install the Magento 2 follow the instructions below:
1. Create an empty database with correct permissions in phpmyadmin.
2. Enter your Magento 2 url in browser and hit Enter.

3. Click on "Agree and Setup Magento".

4. Now Magento 2 will check your environment for readiness for the setup. Click on "Start readiness check".

4.1. If you pass all the checks, you can continue. Have you not, you must fix the error to continue. The 2 most often errors are php Settings Check and php Extensions Check.

PHP Settings Check: always_populate_raw_post_data error. To resolve this error, you need to access php.ini file. Using XAMPP, open this file like that: PHP Settings Check: Search this line: always_populate_raw_post_data = -1 Make sure the number is -1, then remove the semicolon ; at the beginning of the lines.
PHP Extensions Check: The usual missing extensions are xsl and intl. To resolve this, search extension=php_intl.dll as well as extension=php_xsl.dll, then both remove the beginning semicolon .
Please Note:
Now you need to stop both Apache and MySQL in XAMPP, then restart them again for new effects to be activated and resolved. Click Try Again in localhost for new result, after checking, hit Next.
5. Now enter Empty database that you created previously, where you want to install Magento2.

6. Click Next, now you will be asked for web configurations like store url, admin url, Apache rewrites, https options.
7. Click Next, now you can select Timezone, Currency and language in "Customize Your Store" section.

8. Click Next, Enter Admin username, email and password to setup Admin credentials.

9. Now Magento 2 is ready to be installed on localhost. Click on "Install Now". Don’t close your browser until setup is done.


10. After the installer has completed the setup, it will show Success page.

10. Open Magento Admin panel, enter your admin credentials given at the time of setup.

Extension Installation
To install the extension follow the instructions below:
Prepare InstallationWe recommend you to duplicate your live store on a development store and try installation on it in advance.
Backup Magento files and the store database.
Disable all cache related section that you have in your Magento.
Extension Installation1. Download extension package from your my account page
2. In your Magento 2 root directory create (if not exist) folder app/code/
3. Make new directory Hiddentechies/Promobar inside app/code
4. Copy(upload) files and folders from extension archive to your Magento 2 app/code/Hiddentechies/Promobar/ directory
5. In command line, using "cd", navigate to your Magento 2 root directory
6. Run below commands
- php bin/magento setup:upgrade
- php bin/magento setup:static-content:deploy -f
7. Flush store cache and log out from the backend and log in again to see changes.
8. Your extension is now installed and ready for work.
Settings Panel
Once the Promotion Bar extension is installed, proceed to Magento 2 backend to finalize the Promotion bar setup.
Before creating the first Promotion bar we suggest running through extension settings and other available options. This configuration will help to better understand how the extension functions.
To set the configuration options go to Promotion Bar > Configuration.
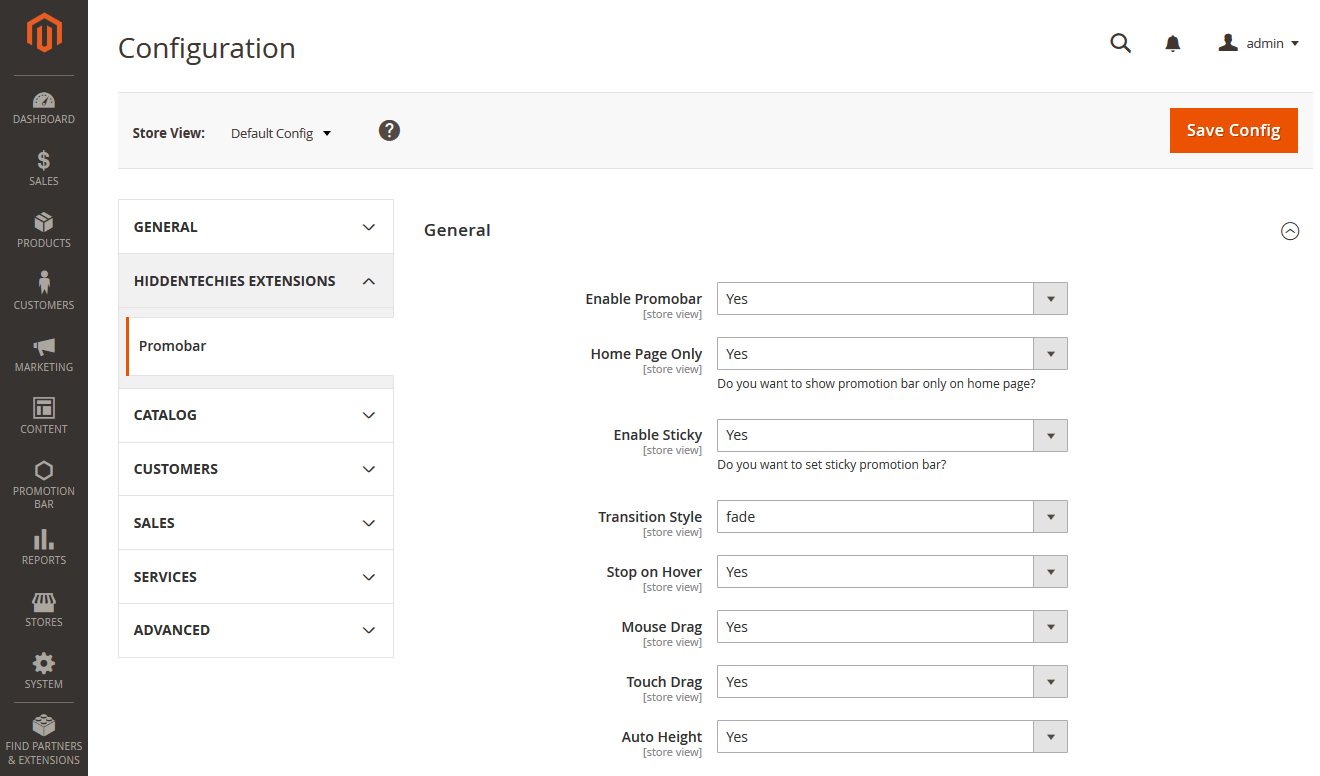
These are the settings that affect promotion bar accessibility, control layout and other functional aspects.
- Enable Promobar: Enable or Disable this extension functionality
- Home Page Only: To enable promotion bar on only home page select Yes.
- Enable Sticky: To enable sticky bar select Yes.
- Transition Style: Select transition style from dropdown like fade, backSlide, etc.
- Stop on Hover: Select Yes or No.
- Mouse Drag: Select Yes or No.
- Touch Drag: Select Yes or No.
- Auto Height: Select Yes or No.
To add the new promotion bar go to Promotion Bar > Promotion Bars from menu.
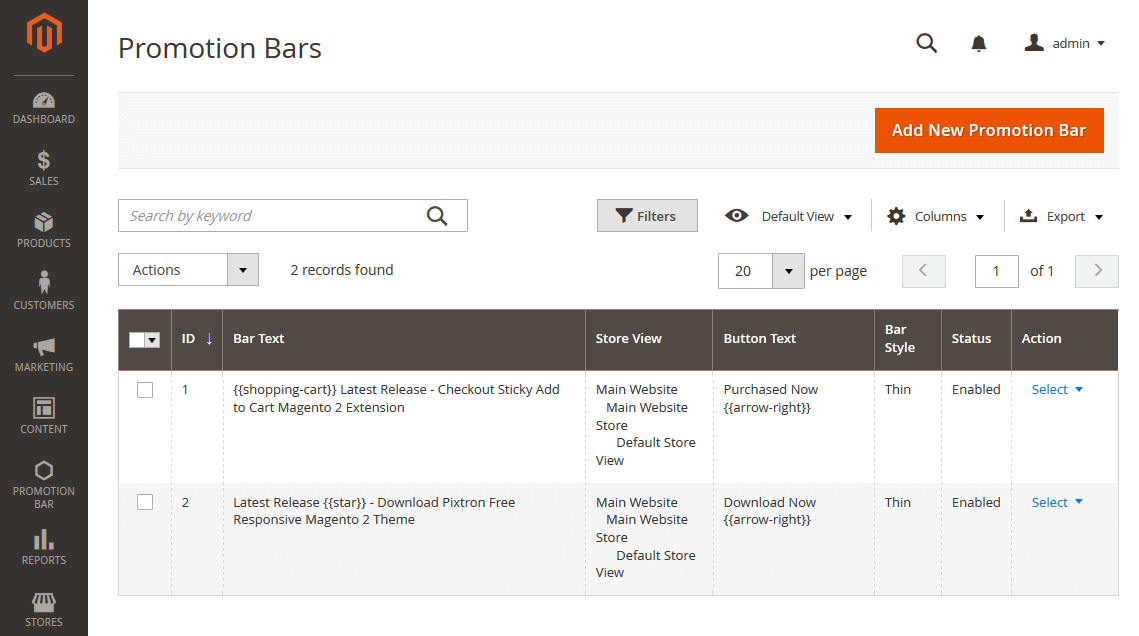
Now click on Add New Promotion Bar button.
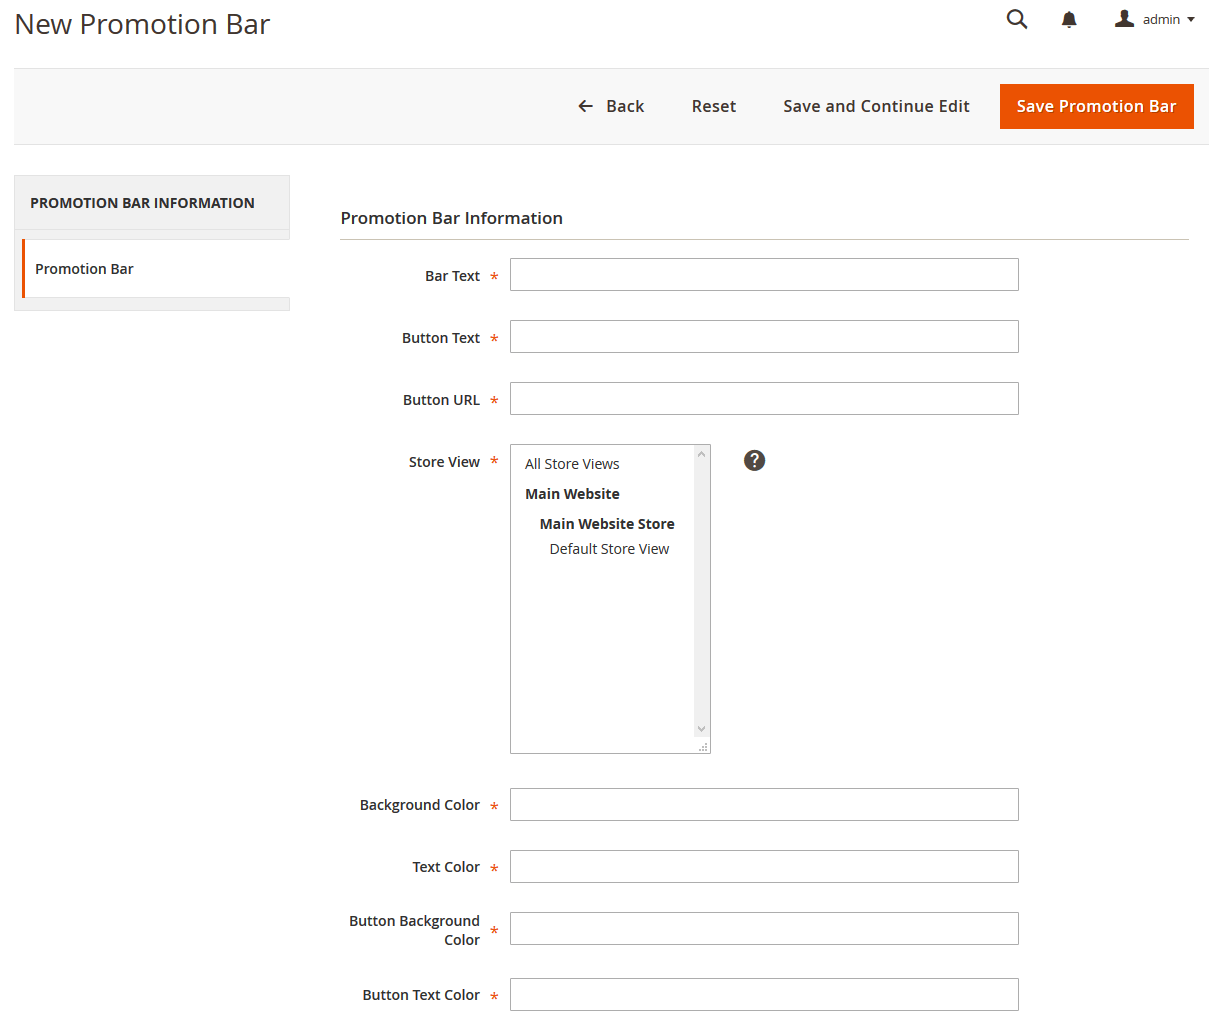
Here, you can add Bar text, Button Text, Button URL, Store View, Background Color, Text Color, Button Background Color, Button Text Color, etc.
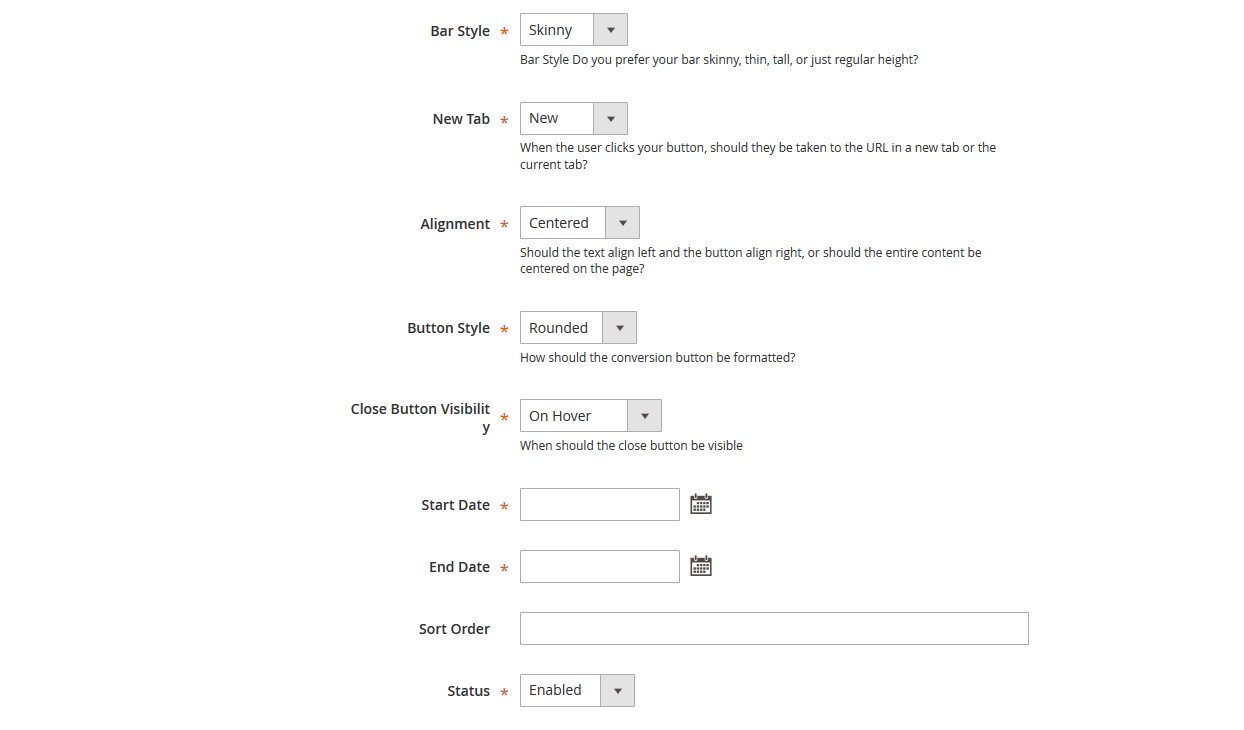
As well as you can also select Bar style, New tab, Alignment, Button Style, Close Button Visibility, Start Date, End Date, Sort Order, Status, etc as per above screenshot.
Once everything added correctly, Please clear cache and check on front end.


Mobile View
Useful Technical Blogs
- How to Get All Regions of Country by Country Code in Magento 2
- How to get CMS Block Collection in Magento 2
- How to Remove Block From Layout on Specific Condition in Magento 2
- Magento 2 - How To Get System Configuration Value in phtml File
- Magento 2 - How to Hide Admin Menu Based on System Configuration
- How to Remove Block From Layout on Specific Condition in Magento 2
- Magento 2 - How to Get Customer Data By Customer ID
- Magento 2 - How to Add Date Picker in Custom Form
- Magento 2 - How to Resize Product Image
Best Selling Magento 2 Themes
Help & Support
Please, if you have any questions, run into any issues or just need some help, do not hesitate to contact us via our Support Center. We believe in providing the best support possible, and we monitor our Support center just about daily.
Your feedback is absolutely welcome!
